

Recently, while dismantling the mezzanine, I found a huge old suitcase. He looked pretty shabby, and his insides smelled old and musty. Of course, in our time it would never even occur to anyone to go on a trip with a large, uncomfortable, angular Soviet suitcase, but, as usual, the hand did not raise itself to throw it away. But, like any craftswoman, I know very well that an old suitcase can be turned into an interesting interior item, an accessory for photo shoots, or just refresh it a little and use it as a container for storing things :)

To decoupage a suitcase we will need the following materials and tools:
A piece of fabric for upholstering the inside of a suitcase;
Wide flat synthetic brushes, paint roller, sandpaper, degreasing liquid, stationery files, pencil, scissors, ruler.
DIY master class on decoupage of an old suitcase
The work will be long because the suitcase is large. First of all, thoroughly sand all sides of the suitcase with sandpaper. It is better to use a sandpaper holder to speed up the process.

After sanding, we thoroughly wipe the suitcase from dust and treat it with an alcohol-containing liquid to further ensure better adhesion of the material to the paints.
We dilute the acrylic primer with water to the state of liquid sour cream and begin to cover the sides of the suitcase. The suitcase, I repeat, is large, so the primer will go faster and smoother if you apply it with a roller rather than with a brush.

But the brush is useful for processing locks, handles, and corners.


After the primer has dried, apply acrylic paint in Mahogany color with a roller.

Using a brush, we refine corners, locks and other hard-to-reach places.

We coat the reinforced corners of the suitcase with bronze paint.


Time to start decoupaging the suitcase. I decided to cover only the lid of the suitcase, choosing a decoupage card for it with a motif of vintage candy wrappers. To finish the sides of the suitcase lid, I chose decoupage cards with polka dots.
We take measurements from the suitcase, draw narrow strips for the side parts of the lid (we leave a small margin to fold the napkins inward, under the lid.

We cut out the strips according to the pencil markings.

We use masking tape to delimit the sides of the suitcase and the top of the lid.

Using a wide flat brush, apply decoupage glue-varnish to the side edges.

Place each strip face down on a stationery file. Spray with water from a spray bottle. Using a brush, carefully smooth out the decoupage card and drain off any remaining water.

And directly on the file we transfer the paper strip to the side part, previously covered with decoupage glue. We try it on so that it is even, and lower it to the surface.

We smooth it through the file, expelling air bubbles and preventing wrinkles from forming.

Carefully remove the file.

And cover the top with decoupage glue varnish.

Fold the small edges of the decoupage card inside the lid. And it’s best to do this with the suitcase open, so as not to accidentally glue the lid and the main part together :)

We glue the decoupage cards in exactly the same way (the suitcase is large and I needed several of them in A4 size). First, apply decoupage glue-varnish to the surface.

Then we transfer the decoupage card onto the stationery file.

Smooth it out and remove the file.

Using a palette knife, blade or utility knife, we undermine the cards in those places where there are corner rivets on the corners of the suitcase.

Cover the top with decoupage glue varnish.
After the decoupage glue has dried, we cover the entire suitcase with several layers of acrylic matte varnish (we apply each layer to dry!) to form a protective varnish coating.

Let's start decorating the inside of the suitcase. In addition to the fact that this will give it a neat look, it will also help get rid of the unpleasant smell of dilapidation inside.
The inside of the old suitcase was covered with some kind of wallpaper. We mercilessly rip them off in those places where this is possible.

Cover the top with plain white paper. I glued it with decoupage varnish glue.

The top of the paper was also covered with decoupage varnish to secure the result.

To support the polka dots on the sides of the lid, I decided to decoupage the inside of the suitcase with polka dot fabric. I bought a piece of fabric, washed it, and ironed it. The hardest part is cutting out the internal pieces.

The gluing itself is simple - apply decoupage glue.

A strip of fabric is laid out on top, neatly and evenly. Press well in the corners.

We also glue a large piece of fabric to the bottom using decoupage glue. Smooth out, preventing the formation of wrinkles.

And iron the top through the paper. Then the already dried decoupage glue melts again and better saturates the fabric, gluing it to the surface.

Ready! We decorated an old suitcase using the decoupage technique. Now you can use it for interior purposes, for storing things, for interesting photo shoots.


Decoupage is conquering cities and countries, and it seems to have embraced something that was difficult to even think of. Not only bottles and boxes, tables and trays, banknote holders and vases are decorated. Even suitcases are decorated, and new pictures from old dull things make an incredibly fashionable accessory. In whatever style you want.
Suitcases have a long history - at some point they went out of fashion, and new travel bags were both more convenient and prettier, but they could hardly boast the same, one might say, charisma. Then Soviet suitcases are taken from the mezzanines, and modern craftswomen use these well-worn suitcases to make an ultra-fashionable item. From a strict brown suitcase, for example, a shabby chic style travel bag is made. Or Provence, or something in a retro style that evokes pleasant associations.

In order to decoupage a suitcase, you will need:
- Three-layer paper napkins;
- Acrylic primer or white paint;
- Special glue for decoupage;
- Pastel crayons (beige, olive, pink) or the same eye shadow;
- Roller;
- Acrylic paint “Vintage Rose”;
- Fan tassel;
- Sharp scissors;
- Sponge;
- Clear acrylic varnish;
- Pieces of leather for patches;
- Awl;
- Suitcase handle (new);
- Acetone;
- Fine-grained sandpaper.
When everything is ready, you can begin the so-called restoration work. This includes removing the paper that lines the inside of the suitcase. Wipe all surfaces - first with a cloth soaked in soapy water, then with a damp, clean cloth.
Leave the suitcase to dry. If there are damaged areas on the suitcase, then patches are applied with an awl and a piece of the desired leather. And they are usually fixed with self-tapping screws.
Step-by-step master class on decoupaging a suitcase
The suitcase is decorated in several stages. Get ready for long but interesting work. And in no case do not push yourself - if some layer needs to dry thoroughly, let it dry.

Master class, suitcase decoupage:
- Use a roller, brush or sponge to prime the surface of your suitcase with acrylic;
- Next, the same thing is done with the inner surface;
- Everything needs to be dried well;
- Then the surface must be cleaned with fine-grained sandpaper;
- Everything is painted in the desired color, for example, pink;
- And again wait for complete drying;
- While the suitcase is drying, take napkins and cut out the necessary images along the contour;
- Separate two layers, the top one with the pattern, and the one on which the pattern is less visible.
This is the first stage of decoration. It may take more than one day. But don’t waste your time - the result is worth it.
Decoration: do-it-yourself suitcase decoupage, master class with napkins
Then turn the suitcase upside down. Take a piece of napkin and place it in the right place. The fan brush is moistened with decoupage glue, starting from the center of the napkin fragment, apply the composition. In all directions, move towards the edges. Be sure to squeeze out any air bubbles and smooth out all the so-called wrinkles. And do the same with all the fragments of napkins that you have prepared.

You need pastel crayons to make the drawing on the pictures of the second layer clearer. Blend everything with your fingers to make it more effective. If you use eye shadow, it rubs on the ribs, corners and rivets, suitcase locks. This will all help create an aging effect.
Finally, the surface must be coated with several layers of varnish. As it should be, with intermediate drying. And if the suitcase handle has already become unusable, it is easier to replace it with a new one than to restore it.
Interior decoration: decoupage of a suitcase in vintage style
And often this is the main mistake of decorators - on the outside the suitcase is just a picture, but on the inside it remains old. This needs to be corrected, of course. It’s not for nothing that they say that a thing can be called luxurious if the back side is as good as the front side.
For this you need:
- Wallpaper of suitable colors with retro motifs;
- Brush;
- PVA glue;
- Simple wallpaper glue;
- Rose color paint;
- Breadboard knife.
The top edge of the wallpaper needs to be trimmed with a zigzag blade. Unwind the roll and measure a length that is equal to the length of the suitcase. Cut it so that you have a rectangle. Divide it in half. Then cut out two more of these rectangles.

Wallpaper glue should be mixed with a small amount of PVA glue. Cut out rectangles that are equal in size to the side walls of the suitcase. Lubricate all rectangles with the resulting mixture from the inside out. First they are glued to the walls, and then to the bottom and lid of the suitcase. Leave everything to dry.
After this, you should cut out strips of wallpaper 3 cm wide and 7 cm long. They need to be glued to the inside corners of the suitcase in order to hide the seams. Then use a brush to paint over all the defects and edges of the sides in the same pink color.
If you want your suitcase to have a vintage style, but not with floral motifs, this could be, for example, images of the Eiffel Tower or the famous red telephone booths of London. It would be good if these images looked like retro postcards. Select the blanks in advance so that everything fits together.
Suitcase decoupage: master class (video)
The work is not fast, but the result will please you for a very long time. And, most importantly, who else will have such a suitcase? It will be exclusive, made by hand. And, perhaps, it will also become a family heirloom.
Most people keep unnecessary things at home and an old suitcase is no exception. In order not to throw it away, you can use and design the necessary thing or furniture for your home.
Making a table for newspapers and magazines is quite simple and quick. The shallow part from the suitcase will be used on the table top. And the lower part will go to the bottom as a thick, wide leg. The top of the table can be covered with wallpaper. The colors can be different: wooden style or the color of your furniture.
Important! The leg needs to be covered in several layers. It is advisable to fill the void with anything.
Bedside tables will be made from two suitcases. Turn it over to the side so that the lid opens like a door. Next, you can attach shelves inside. The finish can be any. Wallpaper or painted with special furniture paint with the addition of shiny varnish. If you turn on your thinking, you can make double bedside tables in the same way.

Chair. Easy to make using one of any size. Use the deep part for seating, and the smaller lid for the backrest. You can attach it with anything. It is advisable to make holes for fastening in advance.

Ottoman. We use the bottom as a leg, having first turned it over to the side. Place another lid on top and secure in three places. Sew a cover for the ottoman.
Armchair. Make a chair: Divide into two halves so that the open, recessed part is at the bottom, upside down. Next, you can replace the connection with springs. You can decorate the chair with a blanket.

Use the deep part of the suitcase. Cover with soft, warm material. The animal will be happy to lie there.

The chest of drawers is made from several suitcases. Stacked on top of each other. First we make a frame from the upper backs. We attach rollers to the backs. We leave the top as a single suitcase. The original chest of drawers is ready for use.
Reference! To get a beautiful look, you need to tape or paint each drawer of the chest of drawers with a different color scheme of paint.

Wall shelves are easy to make. Take and divide into two parts. Next, decorate each part to your liking. Attach fasteners to each part. Then hang it on the wall. The original wall shelves are ready.

Five or six suitcases can be used to make a ladder. Pre-strengthen the bottom one firmly enough. Don't forget to fill it with heavy objects. Next, place the second one on top so as to cover the previous one by a quarter of the base. And so on until the very end.
Important! When connecting everything, use high-quality fasteners that secure tightly. The result is a beautiful staircase.

You can make such a column from an old suitcase. Just pre-make holes on one side for the passage of sounds. Next, put the speakers inside. Give the column the appropriate appearance.

An excellent tool organizer can be made from an old suitcase. And what does it have to do with ready-made latches and locks. To do this, you need to sheathe it with thick fabric or upholster it with durable material.

It’s easy to make a flowerbed: don’t bury the deep part completely into the ground. Next, pour earth inside. The flowerbed is ready.

A hanging mini wardrobe is made like this: we take an old suitcase and line it with plain material on all sides. Don't forget about the lid, which should swing open. We attach it to the wall with special fasteners. The hanging mini wardrobe is ready. For originality, you can insert shelves, etc.

You can make an original minibar like this: take it and decorate it to your liking so that you can open and close it. Insert two small shelves inside. Glue a mirror to the inner wall. This will give the feeling of a large bar when opening the door. On the door itself you can attach small stands for straws and containers for ice.

You can make a doll house quickly. Attach an old suitcase, open and upside down, to the stand. Seal the back part with any material. And make the entrance out of corrugated fabric. Cut out windows on the sides. Attach curtains on the inside. The result is a cozy house for a doll.

You can decorate an old suitcase however you like. For example: cover it with elegant leather, and glue a modern appliqué pattern on top. Or you can make a design from rivets, etc.

Attention! The most important thing is not to overdo it with the artistic part. Don't make provocative drawings. Stick to your chosen style.
It’s easy to make a craft box from an old suitcase. Cover with velvet fabric. This will have a positive effect. And in the inner part, make several compartments of different shapes. Suitable for various items: scissors, knitting needles, needles, threads. On the upper part, sew pockets closed with zippers for various items.

You can use any lid from an old suitcase to make a stand for dog bowls. We seal the lid with ordinary dark film. Scattered food or spilled water after a dog will remain inside the stand. This is convenient for cleaning up after the dog. Especially if the dog is a large breed.

We make a tray from an old suitcase. Take the top part and cover it with a waterproof material of your choice. We give an impressive look: we use a decorative mosaic of small figures from the remaining part.

It is enough to equip the deep part: for dishes, seasonings, etc. Use the top part for forks, spoons and knives. Use your imagination and get an original, comfortable picnic suitcase.

Cut small holes on both sides for air. Next, you can attach the wheels to the bottom. Leave the handle or make it longer in the form of a strap. The main thing is that the animal is comfortable and comfortable. This bag is best used for long distances.

Reference! This is an ideal option for air transport of animals.
Sometimes a suitcase, no matter with or without a handle, becomes completely unsuitable for use for its intended purpose. Then a situation emerges when it’s a pity to throw it away and it’s pointless to keep it at home. Smart housewives in such situations act as follows - they give things that are unnecessary in everyday life completely different functional duties, giving them a second life. Let's find out what you can do from an old suitcase.
Several methods to repurpose an old suitcase
From an old suitcase that has become unnecessary and inherited from your grandmother or mother, you can make very useful and beautiful things. A little imagination and free time, and having the materials necessary for work on hand can turn a travel bag out of regular use into an organizer for storing sewing or knitting accessories, cosmetics, and necessary little things.
Attention! Before starting the rework, you need to clean the surface from any existing contaminants. If the suitcase is leather or plastic, alcohol-containing detergents will help remove stains. Contaminants are removed from fabric using special wet wipes. There is no need to wipe off dirt from a bag covered with paint; it is recommended to clean it off before starting the alteration.
The cleaned lid and lower part can be spray painted, coated with a layer of colored varnish, or covered with fabric. Next, take thick cardboard and cut out long strips from it, which will act as internal partitions. Their number and parameters depend on the purpose for which the suitcase will be used. If there should be as many small sections as possible for storing threads, needles, buttons and other sewing items. If the organizer is prepared for larger items, then the departments in it should be larger in size.
The cardboard sections must be fastened together with superglue or high-quality PVA. If desired, even before fastening, the sectional partitions inside the bag compartment can be painted with a paint that matches the tone, covered with shiny paper or decorated with rhinestones.
An excellent use case would be to use an old suitcase as a picnic box. In it you can store things necessary for a fun time in nature: dishes, tablecloths, blankets, napkins, or dishes prepared and packaged in durable containers.
The step-by-step modification method looks like this:
- The outer surface is cleaned of stickers, dirt and unevenness;
- Use a utility knife to rip and cut off the inner lining;
- The elements chosen for decoration are painted over or varnished;
- A sheet of plywood is attached to the bottom, to which a piece of fabric cut to its dimensions is attached;
- The same actions are performed with the upper part of the box (under the lid) and its inner side parts;
- The rubber band that will hold plates, spoons, forks and other accessories is attached to the plywood using a furniture stapler.
Important! The location of the elastic bands and the size of the objects that they will hold must be calculated in advance. For those things that elastic bands cannot hold, you can sew a small fabric bag and secure it to one of the sides.
How to paint and decorate an old suitcase 
You can transform the appearance of the top cover and side parts using acrylic paints or the decoupage technique. Each of these methods is very labor-intensive and requires perseverance and care.
In order to paint a suitcase with acrylic paints you will need the following materials:
- paints (in a can);
- paint in a tube and brush;
- acrylic lacquer.
- ball pen;
- stencil;
- sandpaper.
Attention! Acrylic paint is quite toxic. Spraying it from a can in a closed and poorly ventilated area is strictly prohibited. If possible, it is better to carry out such work in the fresh air, remembering to wear a protective respirator.
Before painting, a suitcase with a leather outer covering is carefully cleaned with sandpaper. Then it is evenly coated with paint in two or three layers. After the coating has completely dried, apply a stencil to the lid and carefully trace its contours with a ballpoint pen. With a brush I paint over the outline drawn with a pen, filling it completely. After the drawing has dried, it is opened with varnish.
Decoupage is a special technique for decorating hard surfaces based on transferring an image to an object and then opening it with varnish. Decoupage is divided into several stylistic directions, including:
- shabby chic;
- Provence;
- simplecity;
- ethno;
- Victorian;
- vintage.
This kind of decoration procedure can be divided into several stages:
- Preparation. The lid is cleaned of existing contaminants, sanded and degreased;
- Padding. The surface is primed using a roller and a paint brush;
- Painting. The suitcase is carefully painted with a single-color background paint;
- Decoration. A fragment cut out of paper or napkin is placed on a thick film (file). "face" down. The napkin is moistened with water and, together with the file, is applied to the surface of the suitcase treated with glue. The file is removed. After the composition has dried, the picture is opened with a layer of varnish.
What to make from an old suitcase: useful uses 
In addition to the organizer and picnic box, you can make from a suitcase:
- small but functional coffee table;
- toy house for dolls;
- pet bed;
- dresser;
- mini bar;
- distribution;
- bedside table;
- armchair or ottoman.
Music speakers made from an old suitcase look especially interesting. They can be used both in an apartment or in a house, in a car or on the street during family holidays and feasts.
If you have an old suitcase in your garage or closet, you don’t have to throw it away. Turn this item into a designer item and you will know that only you have such a suitcase.
Restoration of an old suitcase

He will be good not only outside, but also inside. You can make compartments and store all sorts of things here.

But first, get the old suitcase off the mezzanine and prepare:
- acrylic paint in a can;
- stencil;
- acrylic varnish in a can;
- needle-punched material;
- fabric for lining;
- furniture nails;
- glue Moment.
You can buy acrylic paint in a can at a hardware store.
If the outside of the suitcase is fairly worn, sand it with fine sandpaper to make the surface smoother. If the inside is dirty, then carefully peel it off and wash it before sewing it back in place.

But using these measurements, you can then sew a lining from a different material.
The paint is quite toxic, so you need to paint the suitcase outside.

Put on a respirator and cover the surface with spray paint. Allow this coating to dry completely.

This is how they give a second life to old things. Now place the stencil on the surface of the suitcase, trace the lines of the design with an old pen that has a non-writing refill.

Take black acrylic paint and use a brush to make the subtle scratches of the design more visible.

Rest for about 40 minutes, during which time the acrylic drawing will dry. If you don't want to tear off the old lining, then choose a material with which you can decorate this part so that the old thing turns into a vintage suitcase.
You can make its bottom softer by placing needle-punched material inside. On one side of this fabric there is wool, and on the other there is synthetics. You need to glue it using Moment glue.

Now we need to prepare the lining. To do this, measure the inside of the suitcase along with the sides, add seam allowances. Attach this material to the base with furniture nails.

Decorate the interior of the suitcase lid in the same way. You can sew a pocket out of shiny material and attach it here so you can then put various small items.

This vintage suitcase can be turned into a toy storage space. The child will be happy to put his pets in it and learn order.

If you want to keep your craft supplies in their place, then use double-sided tape to attach small jars to the inside of the suitcase lid. You can put pins, needles, buttons and various other small items in them.
Place larger items in boxes and a cosmetic bag, and wrap the braid into circles and place them next to each other.

This is how you'll get a vintage suitcase. The house will be in complete order. You can store handicraft items in your suitcase by sewing pockets here or using existing ones. Separate sections of your suitcase to store other items at the bottom.

You can turn an old suitcase into a display case. Look at the stages of work.
Master class - display case

This will be the final work. To make it work, take:
- suitcase;
- white and pink acrylic paint;
- drill;
- electric jigsaw;
- stapler;
- rectangle of plastic;
- lace;
- blue and gold spray paint;
- lining;
- bolts with nuts;
- sandpaper;
- metal brush;
- decoupage napkins;
- oil paint;
- tassels; PVA glue.

If you need to decorate old metal parts, first coat them with gold spray paint and let it dry.
Measure the width of the suitcase to understand how long you need to measure the two clapboard boards. Then paint them. Take the lace and lay it on the cut using PVA. Place folds at the corners. You can decorate these parts with artificial flowers. Place a stencil on the side and use white acrylic paint and a sponge to apply the selected design.

Now, using metal corners, attach the shelves into place. Take screws for this, but take such that they do not protrude beyond the surface of the suitcase. Here the corners of this item are decorated with decoupage napkins.

Cut a rectangle out of plexiglass, the size of which is slightly larger than the cutout in the suitcase. Glue it with a glue gun. Then use a thin drill bit to make holes and screw the mirror fasteners to them.

Now it's time to display various items in the display case and place your new vintage suitcase in a prominent place.

Craft on the theme “Autumn” from an old suitcase
If you love this time of year and have an old suitcase, then you can turn it into a great designer item. This is how it will turn out.

But first prepare:
- suitcase;
- paint in a can for primer;
- decoupage napkins;
- PVA glue;
- acrylic paint “Antique Bronze”;
- brush;
- file;
- water-based paint;
- textured paint;
- acrylic lacquer;
- Dragon glue;
- spray.

Regardless of whether the suitcase is old or new, you need to clean it using a damp cloth and detergent. To make it more convenient to work, temporarily remove the top cover of the suitcase.
The metal parts of this item must be cleaned with kerosene or Vaseline. But if they are in good condition, then this should not be done. Paint the outside of the suitcase using antique bronze paint. And then prime it with yellow paint. If you have white, use it. Then the drawing will be clearer and brighter.

In this case, three-layer napkins with an autumn pattern were used for decoupage. Leave only the top layer, remove the bottom two.

Mix the PVA glue well and apply it to the top of the suitcase lid. Using a spray bottle, moisten a napkin with water, place it on a surface coated with glue, and place the file on top. It is needed so that you can now iron the napkin, removing air bubbles, and it will not tear.
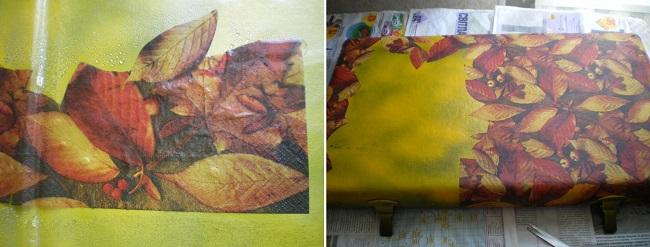
It is better to start decoupaging from the sides, and then decorate a large surface on the lid of the suitcase.
When the glue dries, go over the decorated surface with acrylic varnish. You need to paint in 5-6 layers, allowing each layer to dry completely. Then a glossy crust will form on the surface, which will allow the design to shine and make the item more durable.

But the inside also needs to be updated. To do this, decorate the inner edges with openwork braid, and the sides can be coated with special stone-like paint.
Add a fall theme by adding embroidery to burlap-like fabric. To do this, sew the fabric with two lines of perpendicular stitches and transfer the pre-printed autumn pattern.

To make the embroidery more voluminous, you can make a double layer of fabric, between which you can lay interlining. This fabric is decorated with embroidery either by hand or on a sewing machine.

The photo shows what a decorated suitcase will look like. The embroidery can contain not only an autumn design, but also words of wishes that will always lift your spirits.

Cut a rectangle from the fiberboard that matches the dimensions of the inside of the lid. Glue the embroidered fabric to the fiberboard, tucking its edges.
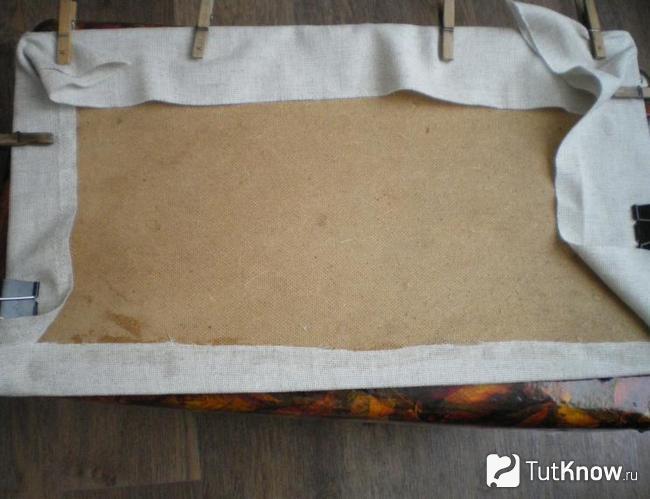
Use Dragon glue for this, and to ensure that these two materials adhere well, place something heavy on the surface while the PVA glue dries. For example, you can place a flat tray or boards and place a weight on top.
Glue burlap to the bottom of the suitcase, then paint it with textured spray paint.
Using self-tapping screws, attach the bottom to the lid, and the handle should be decorated with leather. This is how you'll get a vintage suitcase.

Sometimes suitcases are in very poor condition, but even these can be turned into unique things if desired. After all, this container is perfect for storing Christmas tree decorations. Watch the magical transformation process.
Suitcase for storing Christmas tree decorations

This is what he will become after you try. But at first this suitcase looked like this.

To carry out the magical process of its transformation, the following materials and things came to the rescue:
- acrylic paint;
- acrylic primer;
- anti-mold spray;
- bitumen;
- sandpaper;
- rust primer;
- glitters;
- PVA construction adhesive;
- synthetic paints;
- water-based acrylic varnish;
- glue Moment Crystal;
- printout on photo paper;
- paper masking tape;
- stencils;
- quilted padding polyester.
The dermantine has also become unusable, so remove it using a utility knife.

This is what the suitcase looks like at this stage. It has black mold spots, a swollen bottom, and an uneven surface of the lid. You can level the bottom by moistening it with water from a spray bottle and placing a weight on top.
Now you need to place a piece of beer cardboard on the bottom and a weight on top, for example, dumbbells.

You need to distribute the circles from them over the entire surface of the bottom of the suitcase.

In a warm room, this container should dry within 2 days. If there is mold on the suitcase, then you need to treat it twice with a special remedy for this scourge. The vapors of this substance are toxic, so you need to dry it either under a canopy on the street or on the balcony.
If there are adhesive residues on your suitcase that cause the surface of the lid to be uneven, remove them with sandpaper. Do not overdo it so that the material does not tear.
Fine-grained sandpaper can also be used to treat locks that have been damaged by corrosion.

Now this fittings need to be coated with a rust-resistant primer. Then, using acrylic primer, using a wide synthetic brush, you need to paint the surface of the suitcase with this product.

Since it is intended for storing Christmas tree decorations, the design should be New Year's. A snowman like this would do.

The craftswoman printed this picture using an inkjet printer on photo paper and divided it into 2 parts. Each one turned out to be size A. The printout must be coated with acrylic varnish - three layers. Then this printout must be glued using construction PVA.
Sand the perimeter of the glued pattern with fine sandpaper.

To make the bottom part striped, you need to glue strips of masking tape here and decorate it this way.

To prevent the Christmas tree decorations from getting damaged in your suitcase, you need to sew a cover. The same quilted padding polyester as in the photo would be perfect.

Cut this material to the size of the lid and bottom and glue it in place.

This is how you can turn an old suitcase into the necessary beautiful thing that will become a source of your pride.
Such containers will be useful not only for adults, but also for children, who can store their numerous toys here. The child will be delighted if you make a suitcase especially for his doll. And you can make such a thing from leftover materials.
DIY suitcase for a doll

To make one, take:
- craft paper A4 size;
- tin can;
- skin;
- stationery clothespins;
- paper clips;
- cotton fabric;
- lining material;
- glue Moment;
- universal glue;
- tools: tweezers, core, pliers, pencil, hammer.

Make a suitcase box with a lid. To do this, cut out the parts using craft paper. Here you need to immediately draw up the folds that are visible in the drawing.

A suitcase for a doll will look just wonderful. To do this, place the base of the suitcase made of craft paper on the selected piece of fabric. Trace and cut out.

As you can see, you need to leave fabric allowances in the designated places. Fold them onto craft paper, attach them, and you also need to glue more material to fill the cardboard almost completely. Press down the elements with paper clips to allow the materials to dry.

Now you need to make a handle. To do this, use a paper clip. You need to bend it, glue a ring made of thin leather, which is put on this workpiece.

Cut out iron plates from a tin can, glue them to the inside of the suitcase, and make a through hole. This is where you will place both handles and fold the edges in to secure.

To make the interior decoration, take parts numbered two and three and cover them with fabric. These sides will be internal.

Glue them onto the box and lid. At the box, such a side will protrude outwards, and at the lid it will be on the inside. This will help the suitcase close well.

Now you need to glue the bottoms to the bottom and top of the suitcase using fabric. Place it on a piece of craft paper and attach it. Then glue the pieces in place.

If you want your doll's suitcase to have the same metal parts as the real thing, then cut them out of a tin can, but be sure to sand the edges so they are not sharp. First you need to cut out these squares, then cut half the diagonal of each and roll it into a pyramid.

The diagram clearly demonstrates how to do this.

Glue these elements in place.

All that remains is to decorate the suitcase with clasps, straps, and buckles. Make the belts from strips of leather, and the loops for them from a tin can.

Cut out the buckles from it and also attach them in place. This is such a wonderful suitcase for a doll.

The child will be simply delighted. Now you know how to turn an old suitcase into a new one or make a smaller copy of it for a doll.
We invite you to see how you can turn an old suitcase into a vintage one.
And if you want to turn this item into a convenient table, then watch the second story.